Sunday, November 15, 2015

On a Rugged Path, a Watercolor Impression


Sometime I would like to do another version of this painting.  This time around I was doing a lot of experimenting, not sure exactly what effect I was going for.

When I started this, I was painting at a friend's house and I hadn't printed out the photo I was working from.  I had the picture on my camera.  I would take a look at the photo until the camera shut off, paint what I remembered, then find the photo again, look at it again until the camera shut off and paint again.  I was OK with the process because it gave me a chance to test my visual memory.

Below is what I had by the time I finished the painting session.


When I came home I printed off the photo so I had it to work from for the rest of the steps.


I noted immediately that I had painted the trees and the cliff taller than the photo shows them to be.  I rather liked the exaggeration.

Session 2


Here I was thinking about the figure on the trail.  Should I make the figure dark or the the cliff dark?  How much contrast would be effective?  I was also concerned about the edge where the almost nonexistent trail and the cliff met.

Session 3


I decided to make the cliff dark and strong.

Session 4


I added Orange Lake and Quinacridone Gold to the cliff but wasn't sure I liked it after I had done so.  I started defining the roots and rocks with Ultramarine Blue and Cobalt Blue.  The dark shadows are mostly Ultramarine Blue and Burnt Sienna.  I masked off some spots for more rocks and the little stones mixed with them.

Session 5


A session of bits and pieces...more shadows around the tree roots, more definition of the rocks, more playing around with the edge where the cliff and trail meet, more fussing around with the color of the cliff.  I scrubbed out some color, added some color. My painting buddy reminded me to add the distant trees and ground cover.

Last details...This is the point at which I sit my painting on easel in my studio which is in the basement. Every time I go downstairs for something, I stop on the steps and look at it from a distance.  What needs a bit of touch up?  I adjusted the base of the closest tree, added a little bark texture to the trees, scrubbed out a bit more on the cliff, added a bit of shadow here and there to the rocks and roots.


And then, I stopped.


Tuesday, November 3, 2015

The Carpathian Walnut Tree


This photo doesn't quite catch the impression the tree made on me when I went out to dispose of the trash last night. Its branches shone white from the light of the spotlights on the corner of the garage.

The tree branches spread over more than a third of our backyard.  The swing gives you a clue to its size.  The leaves are all down.  Some years when the conditions are just right the leaves fall all day long like rain.  Usually that means we have had a sudden hard freeze.  This year the leaves fell gradually like those of ordinary trees.


Saturday, October 31, 2015

Sunrise


Charleston Falls, 8 AM, October 31.


Thursday, October 29, 2015

The Drama Workshop Presents Deathtrap by Ira Levin at The Glenmmore Playhouse

Tom, Steve, and I saw Deathtrap at the Sunday, October 25 matinee.  I thought I knew the play but I only knew the title.  That is what happens when one has lived as long as I have.  The play was directed by Joseph Penno, Jr. and produced by Ray Persing.

Deathtrap is classified as a Comedy-Thriller.  I find  having a play described as a Comedy and a Thriller a mind twister.  But the classification is right.  If I had known a little more about the play I would have paid more attention to the twists and turns which are a clever manipulation of typical thriller plots.  I would have said to myself, "Ah, hah, here is plot one and here it is being twisted into plot two."  As it was, I only realized what was happening after I had had a few hours to consider what I had seen.

The play, in a strange way, is believable.  The Deathtrap is a whirlpool that catches everyone and leaves the viewer wondering just where truth and fiction meet.  Adding to the effect is the fact that Deathtrap is the play within the play which, of course, is Deathtrap.  This is a play I would like to see again. Every director and cast would have unique interpretations.

Set...The Bruhls' country house, also the set of the play within the play

There are five actors...

Dennis Murphy as Sidney Bruhl, the playwright with a massive writer's block
Cynthia Mottel as Myra Bruhl, Sidney's wife
Robert Macke as Clifford Anderson, Sidney Bruhl's student in a playwriting workshop
Bill Keeton as Porter Milgrim, Sidney and Myra Bruhl's lawyer
Anne Wrider as Helga Ten Dorp, the neighborhood psychic

When Sidney and Myra discuss the marvelous play, Deathtrap, which Clifford has written, Myra sits embroidering and smiling.  She makes the usual understanding-wife remarks as Sidney schemes to turn events his way and regain his title as an outstanding playwright.  Somehow she reminded me of Madame Defarge in Charles Dickens' novel, A Tale of Two Cities.

Clifford Anderson is mercurial...quick, quick-witted, changeable, volatile.  Exactly who or what is he?  My opinion kept changing.

Porter Milgrim, the lawyer,  is almost what he seems to be.

Throughout the play most of the actors have lines that make the viewer chuckle but the heartiest laughs are for Anne Wrider as Helga Ten Dorp, the neighborhood psychic whose visions are sometimes murky.

The two plays, Sleuth by Anthony Shaffer  and Angel Street by  Patrick Hamilton, are referred to throughout the play.  If you are familiar with these plays (which I am not) I have a feeling that you would find relationships as I did with Myra and Madame Defarge.

If you are in the mood for  mind teasing and especially if you like mysteries, you will find this play interesting.

There will be six more performances,  For more information contact the TDW ticket line at 513-598-8303 or order online at www.thedramaworkshop.org

Tom is able to come to the performances this season thanks to the Clare Schibi Memorial Foundation, Inc, patrons, friends and family who contributed the funds for the new accessible door.


As always, I am grateful to all The Drama Workshop members who donate their time and energy and talents to presenting outstanding entertainment.


Monday, October 26, 2015

October's Bright Blue Weather

October 17, 2015, Charleston Falls  Photo by Pauline

October 17, 2015, Charleston Falls  Photo by Pauline

"O suns and skies and clouds of June,
And flowers of June together,
Ye cannot rival for one hour
October's bright blue weather."

First stanza of October's Bright Blue Weather by Helen Hunt Jackson.

My dad often recited this in October.  I'm sure it must have been one of the recital pieces he learned as a child.  Learning such poems was common when  he was in elementary school and schools presented programs for the parents.  There are eight stanzas in the poem, all of which paint pictures of October.

Below are some other photos of October.


The three photos above were taken by Tom in our backyard.


This was taken by Phil at Brukner Nature Center while walking the Brukner Butterfly Transit.

Postscript

I mowed and mulched after posting this blog.  That's when I noticed the sky was truly bright blue today.  I stopped mowing and mulching long enough to get my camera and take the photo above.

The last stanza of  Helen Hunt Jackson's poem...

O sun and skies and flowers of June,
  Count all your boasts together,
Love loveth best of all the year
  October's bright blue weather.

Monday, October 19, 2015

Lilian Nichols Shows Us How to Make a Spotted Lily Cane, An Adaptation from an article by Jane Zhan in Spring 2007 Polymer Cafe Magazine


We made spotted lilies at our August workshop.  Here are two flowers I made using this technique.  The pink lily requires 2 ounces of the deepest color, 2 ounces of the middle color and 2 ounces of white.  The each petal is about 1 and 1/2 inches long.  Each petal on the shades of orange and white lily is 1 inch long.

This lily took the class almost four hours to complete.  Lilian helped us by making the Skinner blend leaf cane for us.  The four hours included demonstrations by Lilian and a brief lunch break. While we  ate we talked about the cane so we lost very little time.  The two I have made at home took less time because I learned each time I made a cane.

To begin with, I was taking photos of what we were doing but the last couple hours I spent all my time on creating my cane.  I made the second cane, the smaller orange cane at home so I could get more photos of the steps...and I still missed a couple. I started a third cane, using orange, yellow and white and took  additional photos. There should be enough information here so you can make a cane.  I see lots of possibilities for these lilies besides using them as jewelry.

At our September workshop, Mary Ann brought in brooches and ear rings she made using the August technique.


The petals are raised enough so a chain can be slipped through turning the brooch into a pendant.


Here is my small orange shaded brooch from the side.

And now for the directions.

1.  Make a Skinner blend.  Most basic polymer clay books and magazines give directions for this blend.


2  Fold blend in thirds, folding white to white, middle color to middle color, deep color to deep color.


3.  Run through the pastry maker at a medium setting.    


4.  Start from the light end.


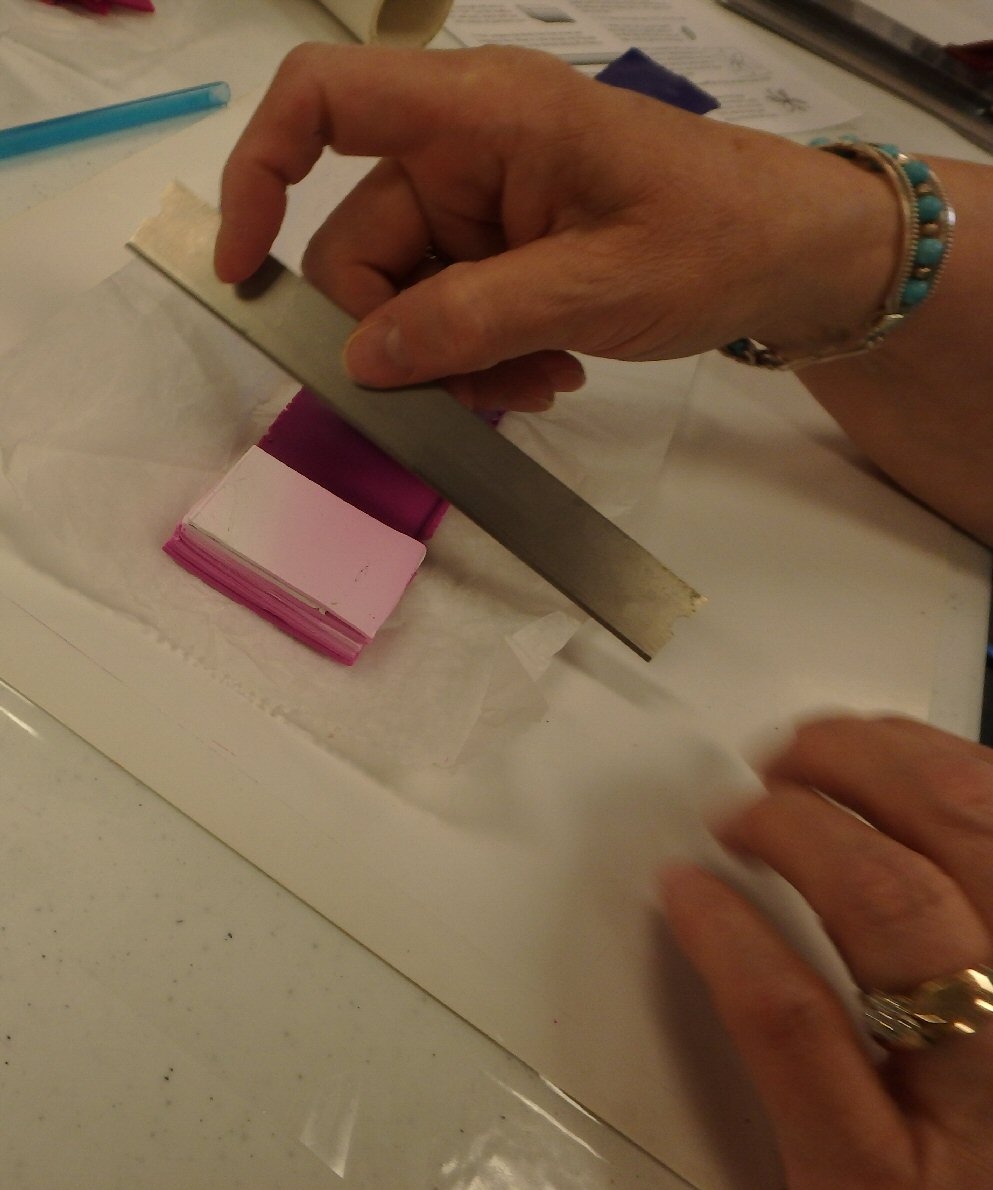
Cut a rectangle about 1 and 1/4 inch wide.  Lay it on the strip,  Cut again.  Continue cutting until you have a block of graduated color.


Here is a finished stack.


5.  Compress and Stretch the stack.  It is important to remember that the variegated sides should remain  3/4  to 1 1/2 inches wide depending on how large you plan to make each petal.

5.1  Compressing


5.2  Compressing


5.3  Continue until you have a block ( a little longer than wide perhaps).


5.4  Flatten and stretch the block, keeping the striped side the wide side,  I have been experimenting with the width.  Lilian's directions suggest that the wide striped side be kept about 3/4 inches wide at this point.  Continue stretching and compressing until the strip is thin enough to go through the pasta maker at the thickest setting.  This will make the striped side a bit wider.


6.  Cut  off the ragged ends  and cut the remaining strip into 6 equal pieces.


Lay strips aside.

7.  Make a bullseye cane.  This will become the spots on the lily.


7.1   Make the core of this cane from the deepest color of the three you have chosen.  It should be about 1/2 inch in diameter and no more than 2 inches long.  (You will have more than enough for the spots.)

7.2  Wrap the core with the middle color sheet rolled to the second thinnest setting on the pasta maker.


7.3  Wrap with a sheet of white rolled to the second thinnest setting  around the bullseye.


7.4  Roll the cane into a long very skinny snake.  The left end is skinny enough.  The right end needs more rolling.


7.5  Cut a total of 13 strips from this long skinny cane.  Each one should be the length of the 6 strips you have set aside.

8.0  Lay the 13 skinny strips on as shown in the photo below.  The top numbers denote the rolled strips.  The bottom numbers correspond to the number of long skinny rolls on each strip.

8.1  Layer the strips...


 Strip 4 with two long "snakes" goes on next
 Strip 5 with 3 long "snakes" follows it.

Top the stack off with strip 6.


View from the end.


9.  Turning the stack into a petal.  Pinch ends together.


9.2   Compress and stretch.


9.3  Cut the petal cane into two logs.


9.4  Wrap one log with white.


9.5  Wrap the other log with middle color, then with white, then with the deepest color.


Set the petal canes aside.

10.  Make a leaf cane.  This can be a roll of green shaped to resemble a leaf or a Skinner blend stacked and shaped to resemble a leaf.  


11. Slice off 6 leaves.  Lay them on a dark green base.  Cut around the leaves.


11.2  Make a small ball of clay and press it into the center.


12.0  Assembly.  Cut three petals from the triple wrapped cane.  Use a small diameter knitting needle or similar rod to aid in raising each petal above the leaf under it.  Press leaf down on the ball at the center of the leaf cluster and also where the tip of the petal touches the pointed end of the leaf.  Repeat skipping a leaf between each petal.


12.1  Apply 3 petals wrapped in white in the remaining spaces.  Add a decorative center.  Some crafters used small crystals.  Others made a textured ball.  I put a bead in the center of a ball of clay for this one.


Here are our first spotted lilies, fresh from the oven...30 minutes at 275 degrees Fahrenheit. 


Annette, DeeDee, Linda, Lilian, Mary Ann and I contributed examples to this post.