Friday, August 30, 2013

More About Miss Grace Durrin

Miss Durrin was a legend.  She was ardent about her subject, Children's Literature, at a time when it was often dismissed as a lightweight field.  Her course was dreaded by many elementary teaching majors because it was not an easy course.  We were expected to go out of her class knowing something about children's literature, the more the better.

The big project for her class was a collection of children's poems, at least a hundred neatly typed and bound in a sturdy binder so we could use it in our classrooms.  I had been alerted to this project before I went to college by a woman I babysat for.  She offered me her book if I wanted to use it.  She was proud of the "A" she received on her selections.  She said she used her book a lot when she was teaching

I took her book though I intended to make my own choices since I have always liked poetry of all kinds.  I enjoyed reading poems and picking out my favorites but putting the book together was a major problem for me.  I was an terrible typist.

Another relic in the basement, my high school graduation gift from my parents.

In those days  the only three ways of correcting  typing errors were to use White-Out, a liquid bought in a bottle, or small  rectangles of paper covered with a chalky substance which covered up the error when typed over, or erasable typing paper.  She told us we were not allowed to use the erasable paper.  She wanted a neat collection with no errors.

I typed page after page, only to make horrible typing errors as I neared the end of the page. Then I got nervous and started making errors after typing only a word or two.  Finally, my blessed roommate took pity on me.  She typed most of my collection.  Many of the poems in my book are from the book of the woman I babysat for.


That project was one of the best projects ever required of me.  I still have the book. It's in the basement, too. The bits of white on the cover are from the label which fell off some time or another.


I used it in every classroom I ever taught in...first grade, third grade, fourth grade.


This is the first page of the four page contents list.

Thursday, August 29, 2013

In Memory of Grace Durrin


She read what has become one of my favorite poems of all times in her Children's Literature course at Bowling Green State University.

The Night Will Never Stay

The night will never stay,
The night will still go by,
Though with a million Stars
You pin it to the sky;
Though you bind it with the blowing wind
And buckle it with the moon,
The night will slip away
Like sorrow or a tune.

Eleanor Farjeon

I found Miss Durrin's photo in one of those things I have saved because I have a big basement...The 1957 KEY...the Bowling Green State University yearbook.

Sunday, August 25, 2013

Easy Folded Paper Houses

The Tipp City Area Arts Council sponsored Children's Art Adventures the first Saturday morning in August.  The site was adjacent to the Saturday Morning Farmers' Market.  Early in the morning the rain poured down but by the time people began setting up the day was clearing.  There were about twenty different booths where children  could make art projects. The activities were planned for ages three to thirteen  Tote bags were provided for them to carry their finished projects.  The cost was five dollars to help defray the cost of the supplies.

Most of the booths were on the lawn of the Crossroads Community Church.  Four booths, including mine, were in the all purpose room.  Four helpers and I helped  the children make Folded Paper Houses.

I have no idea where my son and I found this project forty-five years ago.  He had a lot of fun making these little houses.  When I taught first grade, we made them as a class.

The houses are a good project for a wide range of age groups. The basic house can be folded by six year old children but the refinements are endless.  One of my helpers was in junior high and another one was going into high school.  They came up with a variety of ideas as they worked with the young children.

The third helper was a middle-aged man.  He contributed the flower shop as well as the beginnings of a strip mall.   I made Tom's Auto Repair which is a variation of the house.


Helper number four was a grandmother, like me, and helped the very young artists find the roof so they could color it.  Once the preschooler had colored the roof and added doors and windows, she put the houses together for him or her.

Here is the sample house that I taped to the How to Make It poster.  In the background behind the orange truck is another variation of the house.  It is a box store which is a  common type of store today.


This is the How to Make It Poster.

The sample house is in the bottom row, the last sample with a rolled piece of tape and a sample chimney beyond it.

Here is a copy of the directions page  I sent home with the children so they could make more houses at home.  If you click on the picture, it will enlarge enough so you can read the directions.


These little houses are substantial enough for even young children to play with for a day or two if the ends are stapled together.  Taping does not make as sturdy a house. Older children can keep and play with their buildings much longer.  Many of them figured out ways to make 3-D chimneys for their houses.  One taped his house to another square of paper and added a garage and driveway beside his house.  

To make the box store, follow the directions until you get to number nine.  The box store requires only four cuts, the upper cut and the lower cut on each side.

A few houses and little vehicles are shown in the village below.  I made the village streets by attaching black duct tape to a round fabric-backed vinyl  tablecloth.  This makes an almost indestructible  road grid that can be folded and packed away between uses.  This village turned out to be useful . The two year old children played with the cars on the roads while the parents helped the children who were a bit older to complete their houses.


Tuesday, August 20, 2013

Creating a Gray Scale

I taught a class this summer to a friend who wanted to understand color better.

She has a copy of Color Choices, Making Color Sense Out of Color Theory by Stephen Quiller.  We talked about the two value scales on page 28.  The first is a gray scale.  The second relates orange to the gray scale.


She felt she understood the examples on this page.  She decided to try the first study on page 32 on her own but she didn't want to copy the study, just use the concepts so she chose her own photo.  I thought this was a good decision.  Working on a different painting is a more valuable way of learning since a copying a study only means you can match colors, but not necessarily that you know how the colors were chosen.


After painting her chosen scene, she decided she wanted to go back to page 28  and consider in depth what Quiller was showing the reader.

There are at least two messages from Quiller in these value examples.  The first has to do with gray scales in general.  The second has to do with color and its relationship to the gray scale.

I took a color theory course thirty years ago at a local university which turned out to be one of the most valuable courses I ever took.  After thinking about page 28, I decided to redo some of the assignments, too.

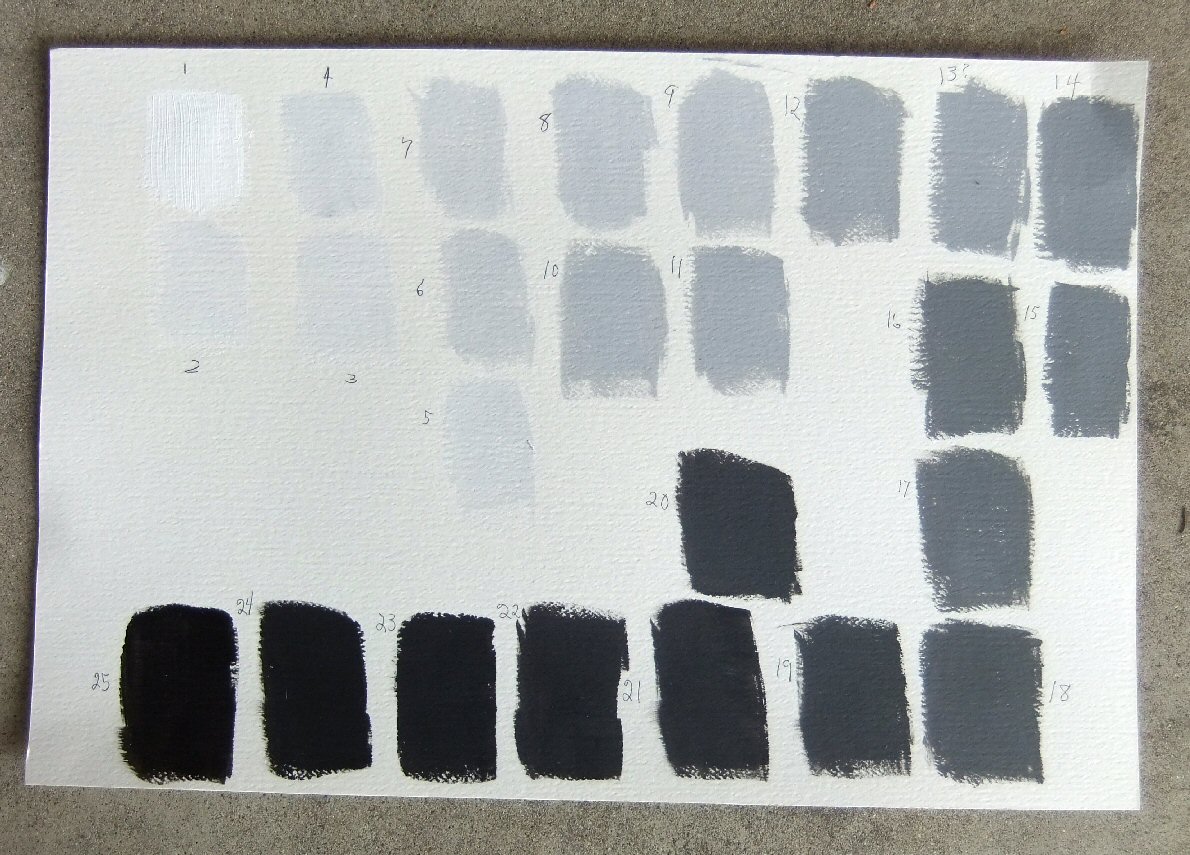
This was one of the first assignments.  Make a gray scale.  Be forewarned.  This will take an entire afternoon.  What seems simple is not always so.

It helps to be systematic.  I squeezed out a blob of white acrylic on the left and a blob of black on the right.  I mixed the values on the space between the two blobs.


I painted a page of  acrylic paint swatches using a 1 1/2 inches wide brush. If you do this, remember that acrylics dry to a  darker color than what you paint on the paper.  Watercolors dry to a lighter color.

I only need ten steps in the final product but I know from past experience that it is smart to paint many more variations.   If there seemed to be too big a value change from one value to the next, I remixed and painted the new values below my top row which I was painting left to right. When I came to the end of the space in the first row, I added my swatches under one another.  At the bottom of the page I continued swatches, right to left.  It helps to judge the value if the new swatch abuts the previous one.


 Afterward, I numbered the swatches in value from lightest to black.  This is something  I have learned makes the next step easier.  I wrote their sequence number in the corner of each swatch or on the back as I cut them out..

To me, the next part is a bit like a puzzle. I chose a pale gray sheet of pastel paper to lay the swatches on. I laid down the values side by side, weeding out the ones that showed too little variation from one to the next.  However, I kept all the swatches.  Nothing is final in this puzzle.


Next I laid white on the left and black on the right and chose a value from the middle of the progression.


The next step is to fill in the spaces with values that are equal distant in value from left to right.


These were the choices I made on Monday.  Since I photographed them, the values are not exactly what they truly are.  Cameras come close to exact colors, but only close.  There are eleven swatches.  Nine or ten would be better.

These are the choices I made on Tuesday.  Above the row are the swatches I pulled out and replaced.  When I clicked on this photo and enlarged it, I decided I can probably pull out number 30, the next to the last square.  That would leave ten color values. (You can  enlarge the photos by clicking on them, too.)


Value is relative.  It depends on the lighting. The first set of swatch selections was made in my basement studio.  The second set of selections was made on our patio this morning.  Add to the lighting variation, the fact that each person's eyes and brain see differently.  All we can come up with is a best approximation.  But this approximation is of great importance in all art work whether it is considered a craft or fine art.

If you are wondering why there are 25 swatches on the original sample swatch page but 31 in my later samples...I want to save an example of the order in which I paint the swatches.  The first page I painted had 31 swatches, the second page  had 25.

Actually, an infinite number of values can be mixed.  However, we don't need that many to make a Gray Scale.  As an artist becomes more aware of value variation, he or she might be able to make a gray scale with even fewer swatches to choose from.  I would rather have too many choices than to have a gap somewhere so I must go back and make more value swatches.


Friday, August 16, 2013

Butterfly Transit Walk, Brukner Nature Center, August 11, 2013

We met at 11 AM.  The day was just beginning to warm up.  Before we officially started, we saw butterflies...Red-spotted Purples and Hackberries.  Both were on the porch of the Brukner Interpretative  Center when the official count began.

Phil took this photo of the Red-spotted Purple on Brukner's welcome mat.

Photo by Phil Shafer
Red-Spotted Purple (Limenitis arthemis astyanax)  Wingspan 3.0-4.0 inches (7.6-10.2 cm)

Hackberry Butterflies often land on people, on their clothes or their arms or legs.  This one landed on Jim's shoe.

Photo by Phil Shafer
Hackberry Butterfly (asterocampa celtis) Wingspan 2.0-2.6 inches (5.1-6.6 cm)


As we headed toward the back of the Interpretative Center, I stopped to photograph the reddening seedpods of the Jack-in-the-Pulpits.  These are all female plants.  Male or gender-neutral "Jacks" do not produce seedpods.

Photo by Pauline

At the back of the building, Ruth made an exciting discovery on the spicebush.

.Photo by Phil Shafer
Spicebush Swallowtail larva (Papilio troilus)  Wingspan of adult 3.5-5.0 inches (8.9-12-7 cm)

This is the very young caterpillar of the Spicebush Butterfly.  It is camouflaged  by looking like a bird dropping.  It also curls the edge of a leaf around itself for further protection.  After a number of molts, it will look like this.

Photo from Caterpillars of Eastern North America by David L. Wagner, Princeton University Press

Phil took this excellent photo of an Eastern Comma with its distinctive silver comma displayed.

Photo by Phil Shafer
Eastern Comma (Polygonia comma) Wingspan 2.0-2-4 inches (5.1-6.1 cm)


Down by Cattail Pond, we saw a few butterflies and also other wild creatures.

Photo by Phil Shafer
Dragonfly

Photo by Phil Shafer
Eastern Painted turtles.

Inside the woods, we found a Tiger Swallowtail which seemed to be newly emerged.  It was still wrinkly, its wings not quite completely unfurled.

Photo by Pauline
Eastern Tiger Swallowtail (Papilio glaucus) Wingspan 3.5-5.5 inches (8.9-14.0 cm)

Along the drive among the prairie flowers and grasses planted by Pheasants Forever, a conservation group, we saw Orange Sulphurs.

Photo by Phil Shafer
 Orange Sulphur (Colias eurytheme) Wingspan 1.6-2.4 inches (4.1-6.1 cm)

In the planted butterfly garden, a Silvery Checkerspot paused.  Do you see the single white spot on each hind wing that distinguishes this butterfly from the Pearl Crescent?

Photo by Phil Shafer
Silvery Checkerspot (Chlosyne nycteis) Wingspan 1.4-2.0 inches (3.6-5.1 cm)

And, always, an unidentified skipper.

Photo by Phil Shafer

Sunday, August 11, 2013

Brukner Butterfly Transit, August 4, 2013

Northern Pearly Eye (Enodia anthedon)  Wingspan 1.75-2-6 inches (4.3-6.6 cm
Photo by Phil Shafer

Stephen and I went to Love Rides the Rails in Cheviot, a suburb of Cincinnati, on Sunday so I didn't walk the Butterfly Transit.  When I saw this photo that Phil sent, I thought, "This butterfly doesn't look like any I know."  I was right.  Ruth sent a summary email about the August 4 walk, naming this one.  It was one of two firsts for the transit walkers this year.

This is the other one. Taking photos is really important.  It is a way of capturing the butterflies without netting them and possibly harming the delicate creatures.  Later we can look through the field guides and compare markings in the books with the photographs.  The determination was made that this was a male Zabulon skipper.  In this species the males and females are marked differently.


Photo by Phil Shafer
Zabulon Skipper (Poanes zabulon)  Wingspan 1.0-1.4 inches (2.5-3.6 cm)

Some of the other butterflies seen on the transit walk.  All photos are by Phil Shafer.


Summer Azure (Celastrina neglecta) Wingspan 0.80-1.25 inches (2.0-3.2 cm)


Eastern Comma (Polygonia comma) Wingspan 2.0-2.4 inches (5.1-6-1cm)


Hackberry (Asterocpama celtis) Wingspan 2.0-2.6 inches (5.1-6.6 cm)


Pearl Crescent (Phyciodes tharos) Wingspan 1.25-1.6 inches (3.2-4-1 cm)


Silver-spotted Skipper (Epargyreus clarus) Wingspan 1.75-2.4 inches (4.4-6.1 cm)


EasternTiger Swallowtail (Papilio glaucus) Wingspan 3.5-5.5 inches (8.9-14.0 cm)

Thursday, August 8, 2013

Brukner Butterfly Transit, July 28, 2013

This July 28 report is several weeks late.
 Yesterday, Phil sent me the photos he took on August 4.  I will try to post them later this week.

I have been so busy doing that I haven't been on the computer much.  I do have photos for blogs which I plan to post in the following days.

Now on to the photos.

Photo by Phil Shafer
Painted Lady (Vanessa cardui)  Wingspan 1.75-2.40 inches (4.4-6.1 cm)
This is the first Painted Lady photo I have posted this year.  It was elusive.  I didn't attempt to get a photo.  I'm glad Phil got this one.

Below is a Red-Spotted Purple.  I love the frilly edges that Phil captured.  The red spots are on the underside.

Photo by Phil Shafer
Red-Spotted Purple (Limenitis arthemis astyanax) Wingspan 3.0-4.0 inches (7.6-10.2 cm)

Phil also took some good photos of the Eastern Tailed-blue. (Everes comyntas) Wingspan .075-1.0 inches (1.9-2-5 cm)  The males and females are colored differently.

This is the female.

This is the male.
And this is the underside.

The identifying orange markings near the "tails" are visible in all three photos.  The thread-thin tails are there but hard to see.

Photo by Phil Shafer
Question Mark (Polygonia interrogationis) Wingspan 2.25-3.0 inches (5.7-7.6 cm)

In the field we thought this was a Comma but Ruth sent us a report a few days later.  Jim, another photographer on July 28, managed to get a good photo of the underwing.  This is a Question Mark.  There are thin silver markings on the back underwing.  A tiny dot added to a curved silvery "comma" makes all the difference.

Most of the Tiger Swallowtails were ragged.  They were nearing the end of their life span.

Photo by Phil Shafer 
Eastern Tiger Swallowtail (Papilio glaucus) Wingspan 3.5-5.5 inches (8.9-14.0 cm)

I did snap one photo of a fresh Tiger Swallowtail.  I wonder if it is one of the first of the second brood to emerge this summer.

Ruth sent us a summary of the Butterfly Transit for July.  One week was missed because the only day anyone could walk was rainy.  Nevertheless, we saw sixteen identified species in July.  There were also some species not identified. This is the first year we have walked the transit so we have no comparison numbers from other years.