Showing posts with label Portrait and Figure Studio. Show all posts

Tuesday, September 8, 2015

Back to Portrait and Figure Studio, Sept3, 2015

I haven't been to a portrait and figure studio for over a year.  It was good to get back and see artist friends.  It has been a long time since I've seen most of them.

I brought my always-packed painting backpack and a small folding camp table.  I wasn't in the mood to carry a lot of equipment.

We had about two and a half hours to sketch since the model had to leave a bit early.  I drew a pencil sketch with a number two lead pencil and laid watercolor washes on it.

 The sketch is about 8 by 10 inches.


Hayner Cultural Center has asked us to put up an exhibit in their art projects teaching room so when I returned home I looked through old sketches.  Below are the two I framed for the exhibit.


This is in a 16 X 20 frame and is painted with Atelier Interactive Acrylics.  They dry more slowly than traditional acrylics.  Another three hour sketch.


This is a small watercolor sketch, about 5 X 7, in an 8 X 10 wood frame.  I don't remember whether I painted several little paintings that day but I probably did.


Tuesday, October 15, 2013

Portrait and Figure Studio, Molly, October 10, 2013


This is the model we worked from.  Molly was a great model, able to sit still for twenty to thirty minutes at a time.  We give our models fifteen to twenty minute breaks before they return to their pose.  Have you ever tried to sit still in the same position for twenty minutes?  It can be harder work than a person might suppose.

After the first half hour this is what I had on the 140 weight cold pressed watercolor paper.


I started by drawing the figure with a Deep Vermillion Revel Derwent Water Soluble pencil.  Next time I will use a paler color since when I painted over the lines with a wash of Permanent Orange the Vermillion mixed with it to create a brighter color than I wanted.  I also could see that the features of the face needed to be downsized a bit.


During the next twenty minute session, I wiped out some of the redness from the vermillion and started the downsizing process.  I refined the body shapes and also that of the shape of the chair.  I could see that the waste basket that Molly was using as a hassock needed reshaping.


This is the final sketch.   It is about 11 by 9 inches. ( 27.94 by 22.86 cm)

Back home, I wanted to see if I had the head proportionately close to what Jack Hamm suggests on page 27 of his book, Drawing the Head and Figure.

Tracing of the sketch head.
Tracing from the Jack Hamm book.                                                                                                              

I did decide that if I had continued to work on the sketch, I would have adjusted Molly's jaw line a bit and changed the shape of the back of her head just a little. Overall, I was pleased with the sketch.

Sunday, October 6, 2013

Portrait and Figure Studio,October 3, 2013


We are always pleased when a pregnant woman agrees to sit for us.  We decided the title for the works we produced today should be titled "Three Weeks to Go".

We started with two four minute sketches.  I did mine with watercolor.

6.5 by 8.5 inches (16.51 by 21.59 cm)

6.5 by 8.5 inches (16.51 by 21.59 cm)

Both of the above were painted without any drawing first.

When I started the longer pose, I spent the first twenty minutes sketching with a Derwent pink watercolor pencil.  By brushing paint and water on  the lines they disappeared as I continued on the portrait.

The second twenty minutes were spent adding the general color in a manner similar to what I did in the four minute sketches.  The rest of the time was spent refining the shapes.  At the end I added details such as the eyes, curls, and sandals.

11 by 9 inches (27.94 by 22.86 cm)

These are all painted on white 140 weight watercolor paper.  For the skin I used mostly MaimeriBlu  Permanent Orange and MaimeriBlu Orange Lake.  The pants were painted with Quinacridone Gold with a little Winsor & Newton Warm Sepia added.  The shirt is Stephen Quiller Ultramarine Blue Deep.  The hair and the chair are mostly Warm Sepia.

Monday, January 14, 2013

Ida, Portrait Redo, Part 3


Before I repainted this portrait I looked through the head and figure drawing books in my library and decided this diagram from Drawing the Head and Figure by Jack Hamm was the simplest one for me to use. But, being me, I continued to look through the various books. After the third painting session I saw some diagrams in Burne Hogarth's Drawing the Human Head which made sense to me. First of all he divided the basic head into thirds, rather than quarters
.

He also had diagrams of what happens as the head turns. I knew the photo I was working from was almost a profile but not quite. However, I wasn't sure how to adjust for the turn of the head. These diagrams were helpful.


I noted that the distance A to B is the same as the distance C to D. I had looked at these diagrams before but the meaning never really came through to me. Neither of these examples were the far turn that was in my photo but in the next set of diagrams he drew a right facing head that was close to my photo. Thanks to the button on the computer that gives me a mirror image, I turned the right facing diagrams into left facing ones.


And, yes, the Ida in the photo has her head tilted up just a bit so this diagram was helpful also. Again I reversed the image with computer magic.  Ida's head is not tilted nearly as far up as this diagram shows but it reminded me of the curved nature of the human head.


With the information from Hamm's book, I repainted from the original ...


...to this. 


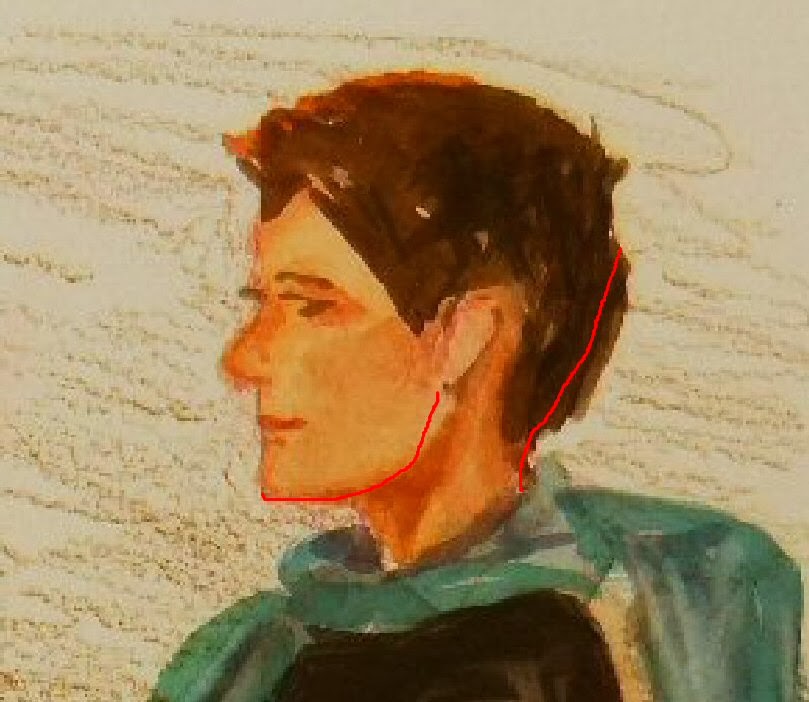
After looking at the diagrams in Hogarth's book, I drew these short green lines on this image using software on our computer.


That was a help.


But I decided I needed more guide lines.


I continued painting and adjusting and finally stopped at this point.


I continue to look at the painting and I see adjustments I could make to improve it. However, I have learned about the proportions of a profile and, as a bonus, a bit about what happens when a head turns. I'll set this aside and work on something else.

Saturday, January 12, 2013

Ida, Profile Portrait, Part 2

Some of you have realized that I am using acrylics for this portrait because I have been painting and then painting over what I have painted. This is easily done with oils and acrylics but not easily done with watercolors which I often work with.

This is the palette I am using.

 
I am also working without a preliminary sketch. I do this in hope that I will gradually train my eyes to see proportions without sketching.  Sometimes I see the proportions and sometimes I don't. I am having trouble seeing the proportions with this profile but I keep on practicing.


This is where I was at the end of the first session.   I had blocked in the rest of the square behind the crown of the hat with light blue to help me get the shape correct.


I adjusted the hat in front of the face.  I also raised the eye and added shape to the lips.


I added black made from Cadmium Orange and French Ultramarine Blue to more of the hat to give  shape to the face as well as the hat.  I also began adjusting the ear.
 

I added some basic shading on and around the ear. I also added a bit more definition on the rest of the face and a few shadows in the hair. The back brim is also roughed in with black.  Notice that I have not yet covered all the lines from the square I painted in the first step.

Before I began the third session, I looked through my books on drawing faces and made some discoveries which caused me work differently.  I'll tell you about them next time.

Friday, January 11, 2013

Ida, Profile,Redo, Part1

<

 
To the left is the photo I took.  To the right is the sketch I painted. Ugh! I am tempted to make excuses but I won't. The biggest problem was that I didn't give her enough "brain". Is that because I am more interested in faces than in the backs of people's heads?


I looked through my collections of portrait drawing books and settled on using this diagram from Jack Hamm's Drawing the Head and Figure, copyright 1963, page 27. It is number 7 in a series of 9 steps. I traced over the head outline with a computer software product, the brush from Jasc. If you look closely you can see the square divided in fourths that he used as a starting point. Further along in the book is the step by step drawing of a male's head, which he draws with different proportions.
I thought that I would get enough information by simply crossing a horizontal and a vertical line. As I proceeded, I wished I had taken time to draw the entire square guide. But I didn't start over. I blundered on.


Next I sketched in the hat, hoping that would help with proportions.


As it turned out, I adjusted the hat several times before I was happy with it. Next I painted in what I saw as the shape of the face. (I saw that shape differently as I progressed further.)


I blocked in the features and left the sketch for the day.   The new sketch is better but more needs to be done.  More in Part 2 which I will put up tomorrow.


Tuesday, October 16, 2012

Portrait and Figure Studio, Oct. 11, 2012

As usual, we started with a few quick warm-up sketches. I am working with Atelier Interactive artists' acrylic. These acrylics dry slower than traditional acrylics which enables me to do mixing on the painting in a more leisurely fashion.
Five minutes...8 inches by 11.75 inches
Three minutes...5 inches by 11 inches. I added the raised leg after the three minutes were up but didn't add the chair she was resting it on.
Four minutes...8 by 11

This is the model posing. Since she holds the pose for a half hour without a break, we encouraged her to find a comfortable position.
Here is the painting after the first half hour. I've blocked in the primary shapes.
After the second half hour...I've refined some of the shapes and added a little detail. I added a bit of background, also.
Another half hour...I continued adjusting and adding details. I darkened the back wall so the model's profile would show up better...and decided I didn't like the results.
It was time to pack up for the day so I decided to spend one more session with this painting at home. I played around with the background and the floor, adding the shadow on it. I printed off an enlarged photo of the model's head and shoulders so I could add a little detail to her face.
This painting is painted on a canvas panel, 12 inches by 16.