Thursday, April 26, 2012

Latest on the Great Horned Owls (Bubo virginianus) at Charleston Falls

Here is a brief picture history of the owlet at Charleston Falls.
Here is one of the parents sitting on the nest on March 6. According to the references I've checked the owlet probably was hatched by this time or hatched within the next day or two.
March 26 was a windy, chilly day and the owlet is huddling in the warmest corner. I expect that the parents were hunting food for it and for themselves. They hunt during the day as well as during the night.

By April 12, the owlet had grown a lot and was curious about the people looking at him. The feathers are developing and his/her breast shows the striped pattern of the adults.
I like this profile I took the same day.
Tom loaned me his camera so I could get closer photos. Here is the owlet on April 16. The wing feathers are noticable and so are bumps on its head where the "horns", really feathers, are pushing upward.
I returned with Tom's camera on April 19. Look at those big yellow eyes.
Yesterday, I went back again and this is what I found.
The Education staff who were working with a group of young children told Tom no one has seen the owlet since Friday. However, I may go back again today.

The references I read say that  owlets stay in the area until they can fly well. Sometimes the parents feed them on the ground and sometimes in nearby trees. The young are dependent on their parents for about five months.

Great Horned Owls eat a wide variety of mammals and birds. They are known to eat Skunks (Mephitis mephitis) which leads me to believe they may not have a good sense of smell.

They are the most comon large owl in North America and also are found in parts of South America. They are related to Eurasian eagle owl (Bubo bubo).

Tuesday, April 24, 2012

Portrait From a Photo, Part 5...Shadows of Face and Positioning the Features

This is the painting as it was at the end of the last blog. I roughed in Green-blue Shadows, being careful not to get too strong until I was sure of where I was going. In the same way I roughed in the upper edge of the hair.
I reversed the image on the computer so I could check the shape and position of the nose.
I made some pencil corrections on the nose since I decided it needed to be moved a trifle. Even a move of less than an eighth of an inch can make a big difference. It is also important to be aware that the stronger green-blue on the shadow side of the nose is affecting the way the nose looks to the observer. By strengthening the shadow on the lighted side of the nose, the nose will seem to change position.
Next I focused on the eyes and mouth. A small ruler aligning the eye to the outer corner of the mouth helped to get the positioning.
The same rulers placed from the nose to the cheek helped me see how one related to the other. By this time I had added a little local color to the wreath and also a little more Quinacridone red and Orange Lake to the hair. Along the shadowed side of the face I added a bit of New gamboge. Often the shadowed edge of the face catches the light at the edge.
You can see that I have strengthened the shadows on the light side of the nose and the nose now is straighter. My goal for this painting is to become more aware of the muscle structure of the facial features. By looking closely, I am seeing more details about nose and about the construction of the mouth. The touch of red on the shadow side cheek and on the chin is Primary Red.

Thursday, April 19, 2012

Walk at Garbry Big Woods Sanctuary, Friday, April 13

Last Friday afternoon, three friends, Tom and I walked at Garbry Big Woods Sanctuary. It was the first time the five of us have been together this spring. The weather was perfect, sunny and in the sixties. (Fahrenheit). We came especially to see the Large-flowered trillium ( Trillium grandiflorum) which are abundant in this wet woods. We saw them in all stages, ready to bloom, blooming, and pink from age. They are one of the white flowers that turn pink just before the petals wither and fall. Tom took all the photos in this blog.
The Large-Flowered trillium have been blooming for over a week. The Drooping trillium (Trillium flexipes) blooms a little later. We saw buds and also open flowers. These trillium blossoms hang beneath the leaves.
To me, the most visible flower interspersed with the large-flowered trillium was the Wild Blue Phlox Phlox divaricata). The woodland was a bridal bouquet for Spring.
Here are some of the other flowers we saw. Goldenseal (Hydrastis canadensis)...
Did you notice the bee on the left flower? There was Wild Ginger (Asarum canadense) blooming on a decaying tree stump at eye level so we didn't have to stoop to see the flower.
Sometimes the flowers were so close together, more than one variety were in the photo. Here are a yellow violet and a Sessile trillium (Trillium sessile) which is sometimes called Toadshade. I don't try to identify the violets except by color. The Sessile trillium is as open as it gets.
Jack-in-the-Pulpits (Arisaema) were easy to find. This is another plant that has several similar species. you can see a Large-flowered trillium and Wild blue phlox in the photo also.
Among the Spring beauties (Claytonia virginica) which crowded in among the Large-flowered trillium and also had large areas mostly to themselves, Tom found Rue Anemone (Anemonella thalictroides).
Most of the Blue Cohosh flowers (Caulophyllum thalictroides) were gone. Tom found a few.
When one flower is finished blooming, another one is ready to bloom. Here is a Mayapple (Podophyllum peltatum) with a bud.

Tuesday, April 17, 2012

Portrait From a Photo...Part 4,Kneadable Erasers, Masking Fluid Applicator, First Wash

This is the photo I am working from.
This is the drawing on tracing paper which I placed over clear acrylic graph. (See blog...Portrait From a Photo, Part 2)
Here is the transferred drawing. I traced over the drawing using a ballpoint pen. A pencil could be used also. The trick is to draw heavily enough so you can see the transferred lines but light enough so the lines are not indented into the paper. (See blog...Portrait From a Photo, Part 3) On this transferred drawing is a kneadable eraser. I will use it to lighten any transferred areas that are too strong. I don't want the pencil lines showing through the watercolor. I press the kneadable eraser on the flowers which have dark transferred lines. When I lift the eraser, the lines are lighter. You can see the lifted lines on the eraser. The lines on the eraser can be kneaded into the eraser, the eraser flattened and pressed on the paper to lighten other lines. See the steps below.
The next step is to cover fine hairs that will be light against a dark background with a masking fluid made specifically for watercolors. I covered the ribbons hanging down her shirt also.
For years I used a small brush to apply the masking fluid but I couldn't get fine lines. I saw an artist demonstrate her "tool". She sharpened the end of one of her brushes. The tool is perfect. The blob on the lid of the masking fluid is dried masking fluid. It is a bit like soft rubber.
After the masking fluid was dry, I laid in the first washes. I used the lightest local color that I expected to have on the face, the shirt and the jacket. I used Cobalt blue for the jacket, Primary red mixed with Quinacridone red for the shirt, and a mix of Quinacridone red, Permanent Orange and New Gamboge for the flesh. These were all very pale washes, (a lot of water and a little paint). After I brushed the paint on with a No. 12 pointed round brush, I wiped off the excess color so the result would be as pale as possible.
Here is the painting at this point with the tools I used. Notice the scrap of paper where I checked my colors before brushing them on the paper. I am painting on Arches ART BOARD which is 140wt. CP paper  attached to a stiff backing. Because of this backing, I don't have to be concerned about my paper warping from the water.

Thursday, April 12, 2012

Charleston Falls, April 12, 2012

The county parks education staff have nature names. This is Sassafras Susan. I saw her as I started off down the trail. She told me she was looking at Sassafras (Sassafras albidum) flowers. I had never seen its flowers so she showed them to me. She said most of them were past their showiest stage.
Since I had Tom's camera because I wanted to get a picture of the young owl, I was able to get a fairly good picture of a fresh enough flower when I took Susan's picture. I am not good at using Tom's camera so the picture is fuzzy.  I hope to go out again tomorrow.  Maybe I will do better.  At least you can see that the flower definitely looks like a flower with petals and stamen. 
She told me the park maintenance crew had to cut down a big Shagbark Hickory (Carya ovata) so I could see its flowers if I looked for them. And sure enough, I found them. Quite a few trees seem to have this type of flower, not very showy.
I found some young leaves also.
When I saw the stump, I understood why the tree had been cut down.
Just before I reached the falls, I came to the the Ohio Buckeye (Aesculus glabra). A couple weeks ago I took this photo of its flower.
Last week, when I took this photo, the flower was opened wider.
I continued on...past the falls,...over the bridge that spans the creek,...along Redbud Valley trail on the ridge behind the falls until I arrived at the owlet viewing site. The owlet is a Great Horned Owl (Bubo virginianus). It is getting feathers now and, if you look carefully, you can see two small lumps on its head. I expect that those are caused by the feathery tufts that will soon pop through the down. Here is a side view...
And here he is looking at me looking at him.

Tuesday, April 10, 2012

Painting Grasses and Weeds and Slender Leaves

Since I have a lot of photos with grasses, weeds, and slender leaves in them, I have been playing around with different ways of depicting  them with watercolors. Here are some of the results and the tools I used.
I began by making a puddle of mostly paint and a little water. Then I made upward strokes with a fan brush that I have cut with a small pair of scrapbooking scissors to make the bristles irregular, more like grasses are in nature. Then I used a rigger, also called a liner to add a few dark green lines.
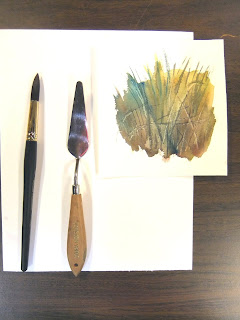
This time I used a No. 12 Richeson Professional 7000 to paint a swatch of strong burnt sienna. After the swatch was a trifle less wet, I scraped out thin leaves with the edge of the palette knife. If I had scraped immediately with the palette knife, the wet paint would have filled the lines creating darker leaves than the background swatch.
First came the ragged fan brush with lots of paint on it. Then when there were a lot of fine leaves, I used the palette knife turned somewhat flat and scraped out wide leaves. I used the rigger to darken the background between the leaves so the leaves would be more prominent.
This time I painted a variegated wash using lots of paint and only a little water. I scraped in some lines when the paint was very wet and other lines when the paint was drier.

If you click on any of the examples, you can see them in a larger size.