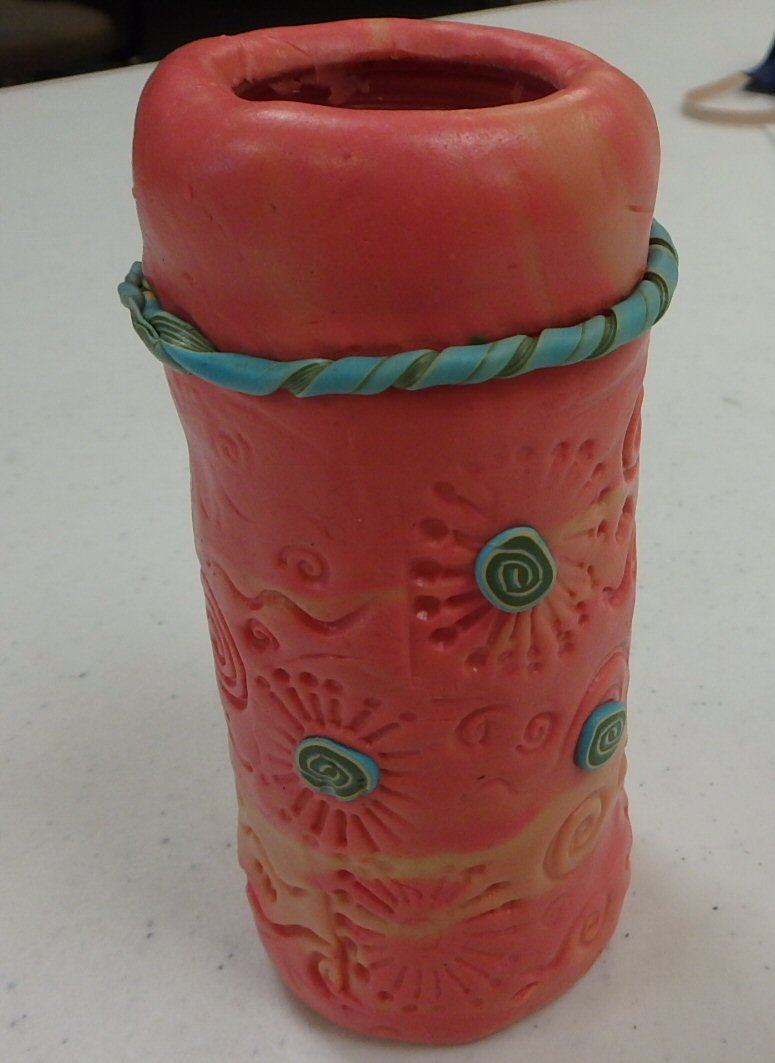
Showing posts with label Lilian Nichols. Show all posts

Sunday, July 19, 2020

Weed Pots, a Polymer Clay Project, Inspired by Alice Stroppel's Weed Pots, Adapted by Lilian Nichols

Butterfly Man

I posted this creation on Facebook.  Some of the readers wanted to know how I made it so I directed them to this blog.  As I planned this blog I realized I have learned a lot about polymer clay since I started taking classes from Lilian Nichols.  

I am doing this as a step by step. If you are interested in polymer clay there are many posts on the Internet from accomplished polymer clay artists. There are also many how-to books.  As with any craft or art, there is much to be learned in a class from a teacher in your area.

Here are the creations of the other group members.


Karen's and Lilian's pots


DeeDee's and Linda's pots

Barbara  did something entirely different with her pot.


Alice Stroppel used small glass bottles as the base form.  Lilian Nichols discovered that the empty amber medicine containers us old folks have can be used also.  The amber containers must be covered with clay before baking.  If the containers are put in the oven uncovered they will lose their shape.  They can't take the heat.

Throw away the lid. This is a small short container.


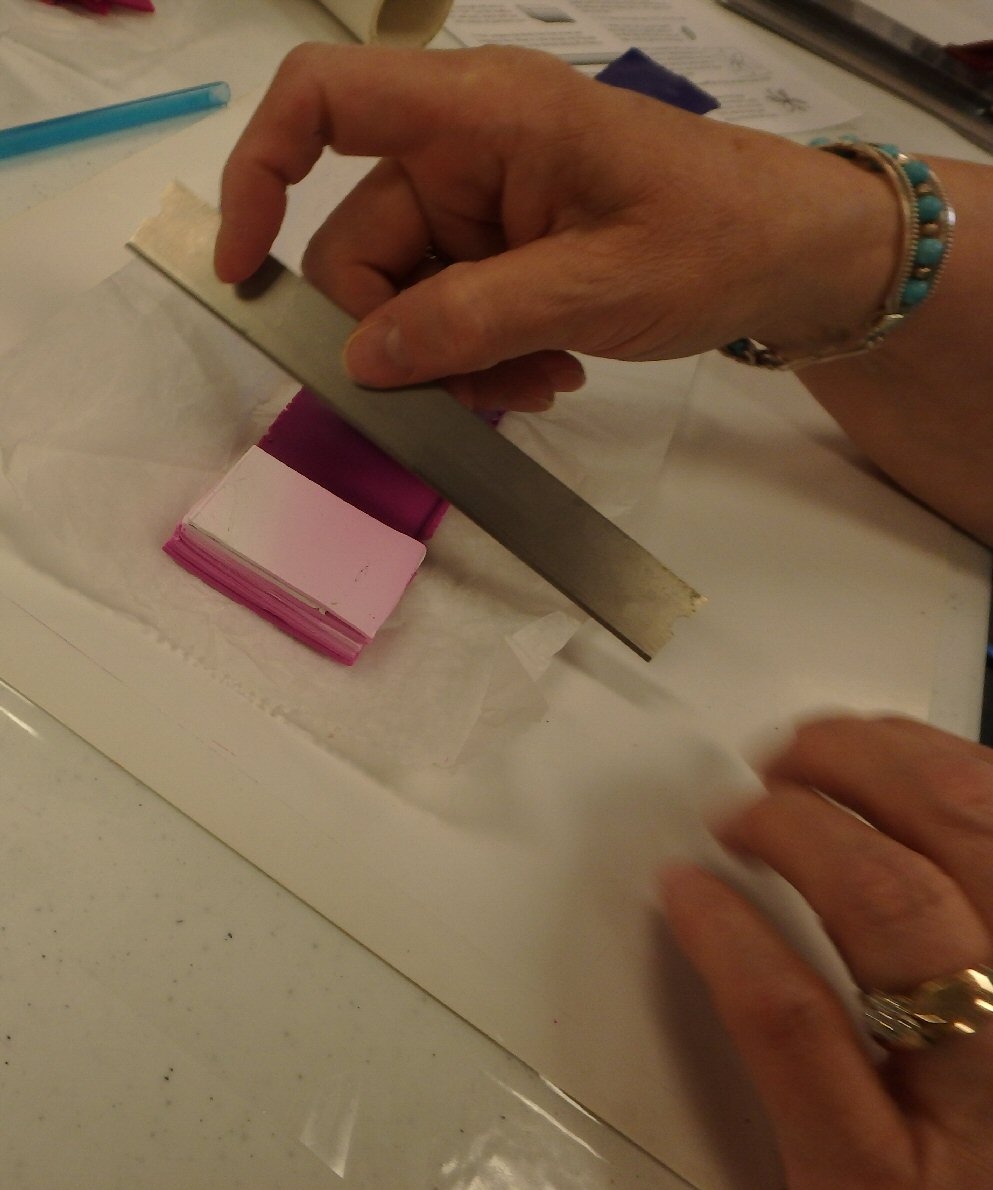
Use three quarters of a block of Premo polymer clay.  All brands are not created equal. Premo is easy for beginners to work with..


Roll the clay until it conditioned and thin enough to pass through the pasta maker at a thick setting.


Cut the clay to size and fit around the container.  Smooth the point at which the edges join with your fingers.


Fold a a length of clay to cover the threaded section of the container, the part where the lid was screwed on.


Fit to container.  


Work the clay collar into the rest of the clay covering.


Cut a circle to cover the bottom.


Attach bottom. The two gadgets at lower left can be used to release bubbles of air that may be trapped under the clay.  Both were made by members of our class.  Blend the clay with your fingers until the covering is smooth.  This step becomes easier as you become more proficient working with the clay.


Finished except for the fun part.


Finishing is easiest if you have been working with polymer clay for a while.  You will have an accumulation of left over canes from other projects.  (canes are described in some of my other blog posts and on the Internet and in polymer clay how-to books.)


I made the nose from a cone of the same clay I used to cover the container.

Bake at 275 degrees for 30 minutes.


I'm planning to use this covered container to make a companion for Butterfly Man. I will post her when I have finished her.


Monday, October 19, 2015

Lilian Nichols Shows Us How to Make a Spotted Lily Cane, An Adaptation from an article by Jane Zhan in Spring 2007 Polymer Cafe Magazine


We made spotted lilies at our August workshop.  Here are two flowers I made using this technique.  The pink lily requires 2 ounces of the deepest color, 2 ounces of the middle color and 2 ounces of white.  The each petal is about 1 and 1/2 inches long.  Each petal on the shades of orange and white lily is 1 inch long.

This lily took the class almost four hours to complete.  Lilian helped us by making the Skinner blend leaf cane for us.  The four hours included demonstrations by Lilian and a brief lunch break. While we  ate we talked about the cane so we lost very little time.  The two I have made at home took less time because I learned each time I made a cane.

To begin with, I was taking photos of what we were doing but the last couple hours I spent all my time on creating my cane.  I made the second cane, the smaller orange cane at home so I could get more photos of the steps...and I still missed a couple. I started a third cane, using orange, yellow and white and took  additional photos. There should be enough information here so you can make a cane.  I see lots of possibilities for these lilies besides using them as jewelry.

At our September workshop, Mary Ann brought in brooches and ear rings she made using the August technique.


The petals are raised enough so a chain can be slipped through turning the brooch into a pendant.


Here is my small orange shaded brooch from the side.

And now for the directions.

1.  Make a Skinner blend.  Most basic polymer clay books and magazines give directions for this blend.


2  Fold blend in thirds, folding white to white, middle color to middle color, deep color to deep color.


3.  Run through the pastry maker at a medium setting.    


4.  Start from the light end.


Cut a rectangle about 1 and 1/4 inch wide.  Lay it on the strip,  Cut again.  Continue cutting until you have a block of graduated color.


Here is a finished stack.


5.  Compress and Stretch the stack.  It is important to remember that the variegated sides should remain  3/4  to 1 1/2 inches wide depending on how large you plan to make each petal.

5.1  Compressing


5.2  Compressing


5.3  Continue until you have a block ( a little longer than wide perhaps).


5.4  Flatten and stretch the block, keeping the striped side the wide side,  I have been experimenting with the width.  Lilian's directions suggest that the wide striped side be kept about 3/4 inches wide at this point.  Continue stretching and compressing until the strip is thin enough to go through the pasta maker at the thickest setting.  This will make the striped side a bit wider.


6.  Cut  off the ragged ends  and cut the remaining strip into 6 equal pieces.


Lay strips aside.

7.  Make a bullseye cane.  This will become the spots on the lily.


7.1   Make the core of this cane from the deepest color of the three you have chosen.  It should be about 1/2 inch in diameter and no more than 2 inches long.  (You will have more than enough for the spots.)

7.2  Wrap the core with the middle color sheet rolled to the second thinnest setting on the pasta maker.


7.3  Wrap with a sheet of white rolled to the second thinnest setting  around the bullseye.


7.4  Roll the cane into a long very skinny snake.  The left end is skinny enough.  The right end needs more rolling.


7.5  Cut a total of 13 strips from this long skinny cane.  Each one should be the length of the 6 strips you have set aside.

8.0  Lay the 13 skinny strips on as shown in the photo below.  The top numbers denote the rolled strips.  The bottom numbers correspond to the number of long skinny rolls on each strip.

8.1  Layer the strips...


 Strip 4 with two long "snakes" goes on next
 Strip 5 with 3 long "snakes" follows it.

Top the stack off with strip 6.


View from the end.


9.  Turning the stack into a petal.  Pinch ends together.


9.2   Compress and stretch.


9.3  Cut the petal cane into two logs.


9.4  Wrap one log with white.


9.5  Wrap the other log with middle color, then with white, then with the deepest color.


Set the petal canes aside.

10.  Make a leaf cane.  This can be a roll of green shaped to resemble a leaf or a Skinner blend stacked and shaped to resemble a leaf.  


11. Slice off 6 leaves.  Lay them on a dark green base.  Cut around the leaves.


11.2  Make a small ball of clay and press it into the center.


12.0  Assembly.  Cut three petals from the triple wrapped cane.  Use a small diameter knitting needle or similar rod to aid in raising each petal above the leaf under it.  Press leaf down on the ball at the center of the leaf cluster and also where the tip of the petal touches the pointed end of the leaf.  Repeat skipping a leaf between each petal.


12.1  Apply 3 petals wrapped in white in the remaining spaces.  Add a decorative center.  Some crafters used small crystals.  Others made a textured ball.  I put a bead in the center of a ball of clay for this one.


Here are our first spotted lilies, fresh from the oven...30 minutes at 275 degrees Fahrenheit. 


Annette, DeeDee, Linda, Lilian, Mary Ann and I contributed examples to this post.