Tuesday, January 31, 2012

Winter Shadows, Part 3


This is the painting after the mask has been removed from the near rocks.


Here I have softened the areas of the rock cliff  which I had masked.  I used a stiffer brush than I normally work with.  This requires careful strokes, firm enough to smudge the sharp edges but light enough so  I don't damage the paper.  A few light glazes of cobalt blue also softened the masked areas. 

I darkened the trees with cobalt blue  and added Orange Lake to the largest tree as well.  I want that tree to be the most prominent. 


A wash of Antwerp blue brightened the sky and distant snow.  I continued working on the near cliff wall to give it more rocky texture and shape.


I am getting close to being finished so I printed the painting in grays.  This helped me focus in on the areas that I will concentrate on next.

If you have trouble leaving a comment, the directions for one way to do so are in "About making a comment" under Labels to the right of this blog.


Thursday, January 26, 2012

Snowflake Bentley

American Profile, an insert in our local paper, featured Wilson Bentley's photographs of snowflakes on its cover this past week.  Its cover reminded me of one of my favorite picture books, Snowflake Bentley by Jacqueline Briggs Martin.  The pictures, woodcuts, were created by Mary Azarian.


Wilson Bentley was born in Jericho, Vermont in 1865.  When he was seventeen, his parents bought him a camera with its own microscope.  By experimenting, he learned to take photos of individual snowflakes.  Eventually, he had a book published, Snow Crystals.  Even today, it is a reference book for scientists and other people interested in snowflakes.  I am sure that some of his friends and neighbors considered him "flaky". 

The gold medal on the cover is the Caldecott Medal given each year since 1938 to the outstanding picture book of that year.  Snowflake Bentley won the award in 1999.

This is the first page.  To me the words are close to poetry.  The illustrations fit the story beautifully.


The story is set in large print but often there are side bars in smaller print with additional information. 


If you have a child or grandchild who is interested in the natural world, check out this book from the library and read it to him or her.  Chances are you as well as your child will learn something.  I did.

If you have difficulty in leaving a comment, click on "About making a comment" under Labels on the right hand side of this blog.  I am always pleased to hear from you.

Tuesday, January 24, 2012

Portrait From a Photo, Part 3


This is the photo I used for reference.


 This is the completed drawing on tracing paper with the grid beneath it.

There are many ways to transfer the drawing to the watercolor paper.  I will demonstrate two.

Turn the tracing paper drawing over and use cover the back with graphite as demonstrated in the photo below.


Turn the tracing paper drawing back to the right side, lay it on the watercolor paper (or whatever surface has been chosen) and carefully  tape the tracing paper to the watercolor paper so neither will move during the next step.


Trace on all the lines you want with a number two pencil. When you take off the tracing paper drawing, the lines have  been transferred to the watercolor paper because of the graphite you laid down on the back side.  In this example, I traced only a few lines because I intend to use the next technique instead of this one.  However, the pencil lead transfer method is an excellent one because the materials are always at hand.


There is also Transfer Paper which can be laid between the watercolor paper and the drawing. Do not use Carbon Paper which is different and doesn't erase.  Put the colored surface on the watercolor paper and lay the drawing on top.


It is important in all tracing work that all the sheets involved in the tracing are securely in place.  If any of the surfaces move during the tracing process the drawing will not be accurate.  Quilters use similar techniques and so do people who embroider and those who do woodworking.


Please leave any comments or questions on this blog and I will discuss them in a later blog.  See "About making a comment" under Labels to the right of this blog if  you have difficulty in leaving a message.

Thursday, January 19, 2012

Belated Christmas Gifts

Cinda, our wonderful park district education director, came bouncing into our house and gave us hugs.  Then she presented us with two belated Christmas gifts.


In the bear is honey from the hives she and Tim have on their farm.  The bees' wax is mixed into it so the flavor is truly special.  She and her family spent part of their Christmas holiday  making the candles.  They used the sheets pulled from the foundation  they insert in the hives and melted wax from the honey combs to "glue' the sheet in a candle shape.  When the candle is burned, the sweet scent of honey fills the air.

The tag around the bear's neck brought us advise for living.


If your eyes are like mine, you will have to click on this picture to enlarge it enough to read the advice. 

If you wish to leave a comment and are having difficulty doing so,  click on the first label in the Labels list, "About making a comment",  for directions for one way to leave a comment.

Enjoy your day. 

Tuesday, January 17, 2012

Portrait From a Photo, Part 2...Using a Grid


8 X 10 inch freehand sketch in pencil

This is the sketch I showed you last week. I want to do a larger 11 X 14 painting.  When I go to Portrait and Figure Studio, I just jump in with paint, adjusting as I go.  This time I decided I wanted to make a study of the subtleties of of the shadows, particularly on the face.  Knowing more about these shadows will be helpful when I do a freehand painting of another face.

I have a lot of choices when I consider enlarging.  I can enlarge the sketch to 11 X14 by simply drawing it larger.

 Or I can enlarge the photo to 11 X 14 and trace outlines of the larger photo.   My scanner has a 8.5 by 14 inch bed so using the scanner would require some manuveuring.  It is possible to make a 11 X 14 scanned photo in two sections. 

But sometimes a scanner is not available.  A person can always draw a grid on either the photo or the drawing as they are now and use the grid as a basis for enlarging.  This is a traditional method of enlarging.


.


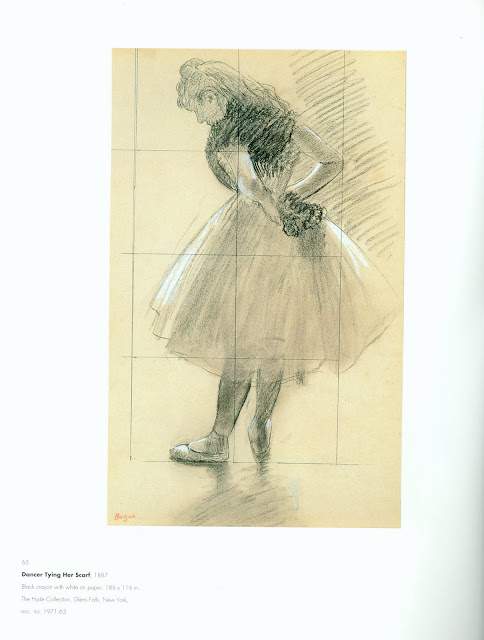
Here is an example from Edgar Degas.  In this case, the drawing is about 18.5 X 11.5 inches.  By drawing a grid with the same number of squares (but larger ones)  on his final  canvas, he could  enlarge the drawing, keeping the proportions the same.  This is something anyone can do by measuring carefully with a ruler. 


I decided to use a transparent grid because I wanted to keep the photo as it was. I made the grid by using heavy clear acrylic which Walmart sells by the yard and a Sharpie Brand pen and a ruler.  It is important to measure carefully.  If the squares are not perfect, any enlargement you make using the grid will not be perfect.  The squares on this grid are 1.25 inches on each side.


I elected to draw the enlargement on tracing paper because I can see a premade grid laid under it.  The final enlargement on the tracing paper will not have distracting grid lines on it.  This grid has 1.5 inch squares. Notice that I numbered the squares along the edge of the photo and the edge of the tracing paper.  That helps me find the square I want to draw in.  I don't always number the squares but it can be helpful.


I usually start in the center when I am enlarging a face.  If I were enlarging a Still Life photo or a landscape photo I might start elsewhere.  The starting point doesn't matter. What is important is that the correct shapes are drawn into each square. 

I  have drawn some of the shadows, leaving them unshaded but and have shaded others.  This is because I am looking for information, not drawing something that will stand alone as a piece of art.  I will be working on this drawing for several more hours.  Below are enlargements of specific sections of the drawing as it now stands.


I haven't put much shading or shapes of shadows on the bottom lip, but I have looked at the photo carefully and will look at it again as I paint. The slanted  area between the bottom lip and jut of the chin has not been shaded either.  I noted with shading that the "color" of the shadow on the  clothing varies from the shirt to the jacket.  There will also be a variance between the skin of the neck and the red shirt.


In this section of the ear, hair , and jaw line, I have started putting in some of the major shapes.


The wreath is simply an outline at this point.  Just as in other drawings, I find it helps to start with the general shapes and refine them gradually. 

I am always pleased to hear your comments.  If you have a question, I will try to answer it in a future blog.  If you have trouble leaving a question or comment, click on "About  leaving a comment", the first Label to the right of this screen.

I hope you find lots of reasons to smile today. 


Thursday, January 12, 2012

Walking at Brukner Nature Center

I walked at Brukner twice this week.  Brukner's  trails tend to go up and down hills. I hike because I like being alone outside in an unspoiled bit of nature but also because I would like to lose a few pounds.  I think I use a few more calories walking up and down hills than I do on trails which are mostly flat. (Much of this part of  Ohio is relatively flat.)

I started down Short Step Hill.  As I neared the bottom, I noticed the limbs of a Sycamore (Platanus occidentalis L.)  parallel to the trail and a tree further down broken off about ten feet up.


This tree beside the little creek that flows down to the Stillwater River had been standing since long before I began volunteering at the nature center thirty years ago.  For many years, woodpeckers have been working on it.  I often pointed out their holes to children I was leading on a hike.

When I reached the stump, I took a photo of the base of the fallen section.  It was hollow just as the remaining stump was.  The creek must have risen after it fell because there was a little collection of rocks and stones in the fallen section.


Nearby, I found sycamore leaves with their distinctive hollow petioles or leafstalks.  Usually the children call them stems.


A bit further down the trail, I found a bit of sycamore bark.  This  piece reminded me of an eye.  Often the pieces of bark which fall off the tree as the tree expands in diameter are larger. 


I continued on toward the little swamp, hoping to see Skunk Cabbage (Symplocarpus foetidus)  emerging.  I walked my usual way along the boardwalk that crosses the floodplain but I had to turn back.


I climbed the trail to reach the swamp from the other side.  And there I discovered that another huge tree that has been there for over a hundred years had fallen.  Many hikers had used its trunk to steady themselves as they started down the steep slope to the swamp. 

Down in the swamp, I found what I was looking for...Skunk Cabbage.  Skunk cabbage doesn't stink if you simply notice it but...if you break any part of it you will understand why it is called "Skunk".  I've been told that the flowers of the skunk cabbage smell good.  None of the open spathes were  near enough to the path for me to test what I've been told. 


I am always pleased to have viewers comment on my postings.  If you feel inclined to do so, you can go to "About making a comment", the first choice under Labels on the right side of  the page for directions for one way to leave a comment.  I have had some friends tell me they were confused by the many choices.

Have a good day.


Tuesday, January 10, 2012

Portrait From a Photo

Portrait and Figure Studio resumes in February so I decided to do some portraits from photos in January. 

The first step is to choose a good photograph which is not always easy.  It is amazing how many strange expressions can be captured by a camera, especially if a person is talking or is self-conscious.  Choosing a photograph with strong lighting on the face is also helpful.  Be aware that a photo from a professional photographer may not have the strong shadows that are helpful to an artist.  The professional is usually trying to capture a flattering pose which often means softening wirnkles and lines.

This is a twelve year old girl.  Her age is important to note because proportions of the face change as a person matures.


I enlarged it to  8 inch by 10 inch so it would be close to the size I planned to draw after I had cropped it so the face was more of the picture.  Here is the cropped photo and my drawing beside it.


If you hold a mirror in front of your drawing  or hold your drawing in front of a mirror, often you can find lines of the drawing which need to be adjusted.  You can also reverse the image on the computer and check the lines that way.  For me, the mirror is quicker than using the computer.


After viewing the drawing, I continued refining it and making the shadows more pronounced since the shadows are important to giving a three dimensional effect. 


This drawing is only the first one.  I will do at least one more, varying the grays.  This drawing is mostly three values, dark, mid-gray and white.

To make a comment, see About making a comment, the first label on the right hand list.  I enjoy hearing from you.

Tuesday, January 3, 2012

Winter Shadows..First Steps


As the painting looked last week.

Stage 2
I started putting texture on the trees with Orange Lake and added another wash of Cobalt Blue to the background.

Stage 3 with Maskit protecting whites
I protected the white of the paper with Maskit which is a bit like rubber cement but  better chemically for the paper.  I laid a wash of Primary Blue over the sky, Burnt Sienna and Orange Lake for the distant trees and a wash of Ultramarine Blue to darken snow in the valley.  The blue on the nearer trees  is Cobalt.

Stage 3 with no Maskit on right side
I took the mask off so I could see the contrasts on the trees.

Stage 4
I added texture to the distant trees with scribbles,  a mix of Burnt Sienna, Cobalt Blue, and Orange Lake. I worked a little on the far cliffs. and so on. I decided the most prominent tree needed reshaping.  I added short strokes of Orange Lake and Cobalt Blue.  I  added washes of Quinacridone Gold, Orange Lake, and Cobalt Blue on the near cliffs. I removed the Maskit and add more washes of Quinacridone Gold, Orange Lake and Cobalt Blue.  The last thing I did was put splotches of Maskit on the cliffs to preserve some of the new washes.  Next I will add more washes to the cliffs and see what I then have.